Tiny videogame for the ATtiny10
What can you fit into an ATtiny10 1kB flash memory? Certainly a lot, and it appears it’s enough for a videogame too! This is a game of 700 bytes that works with just three components: the ATtiny10, an OLED display and a button.
Some time ago I started playing with the AVR ATtiny10. It’s a tiny microcontroller with just 1kb of flash memory and 4 I/O in a SOT-23 package1. At first, you may wonder what is the use of such a limited microcontroller. Still, 1,000 bytes are sufficient for many small applications, especially with some creativity and a thoughtful use of the code. I wanted to bring this to the other extreme and build something notoriously complex and demanding in terms of program space.
So, what better than a videogame?
To build a proper videogame, you need to take care of the game mechanics, input and output peripherals, graphics and so on!
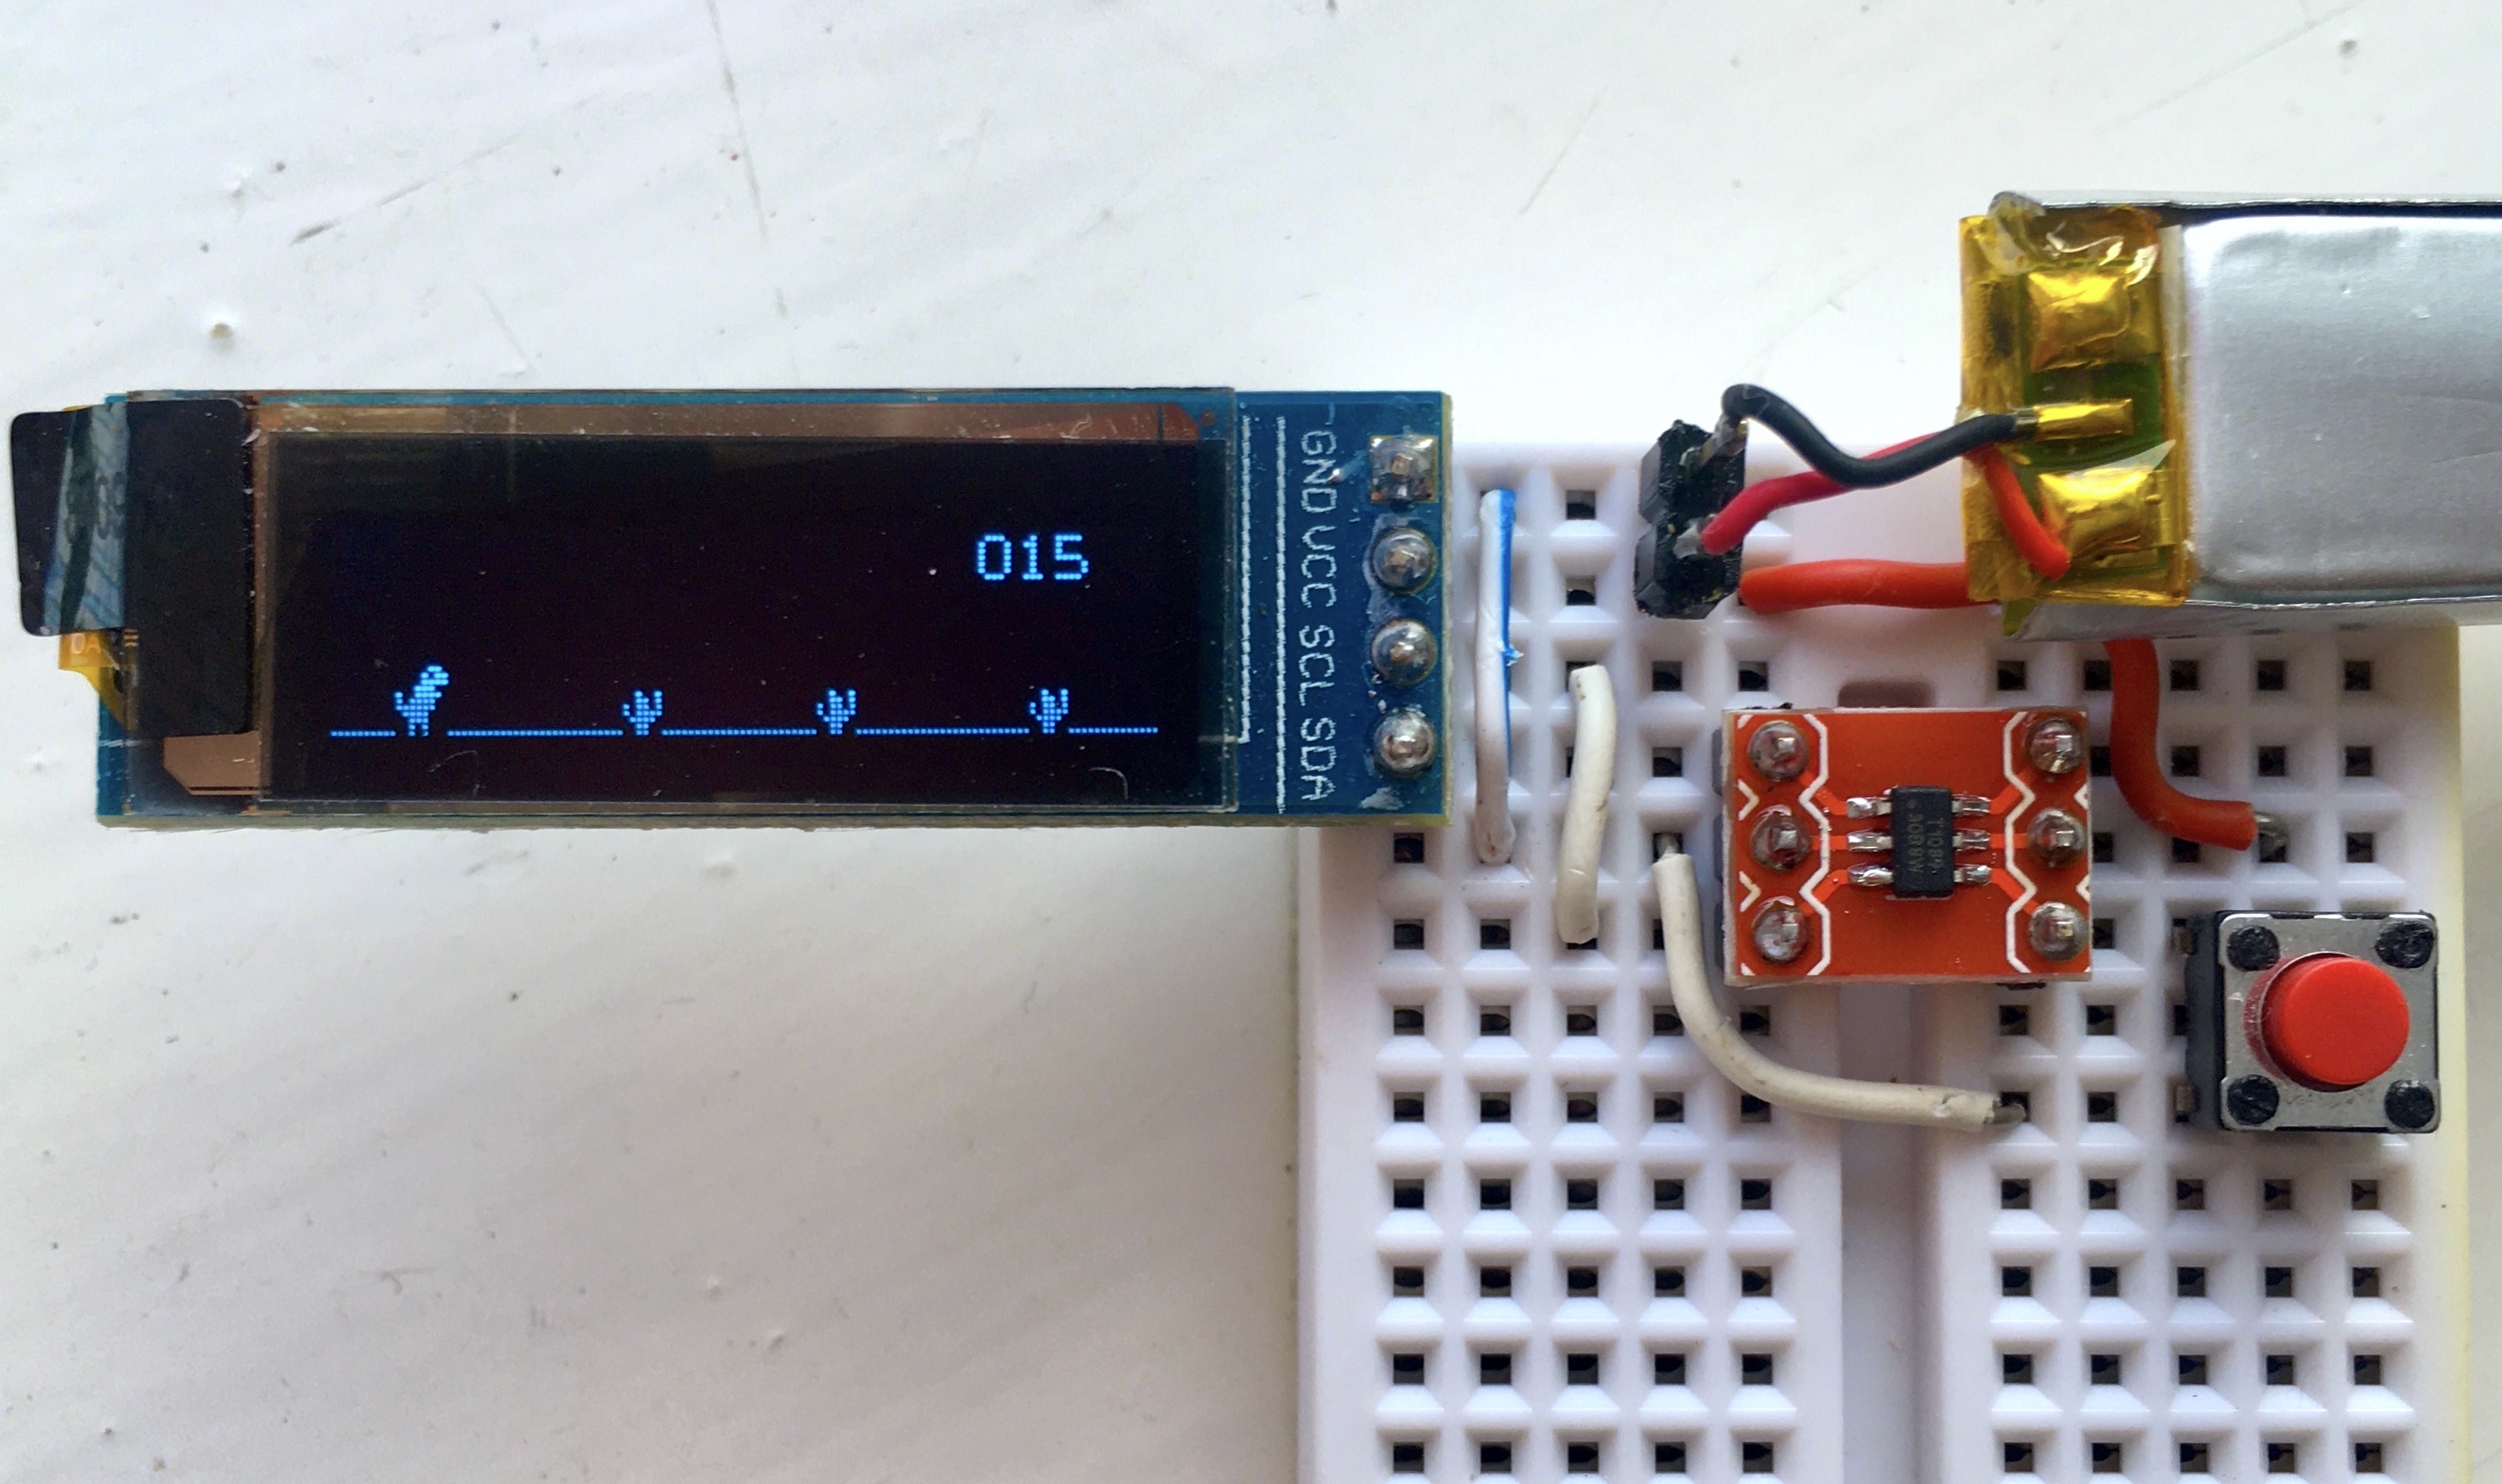
This game is an endless runner where the player has to jump the obstacles using a button. When he hits the obstacle the game ends and the microcontroller goes to sleep. A new button press wakes up the console and restart the game.
Hardware
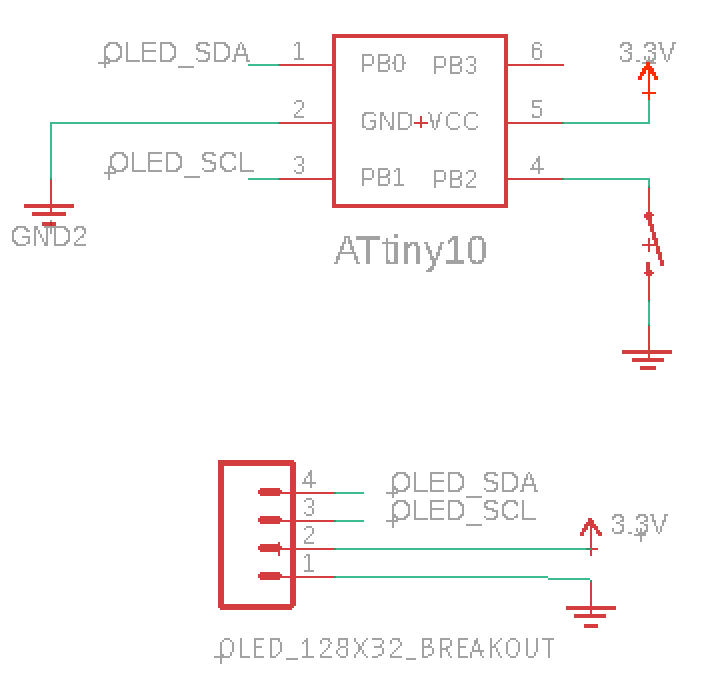
The game uses a 128x32 OLED display breakout board connected by bit-banged TWI through PB0 and PB1 that act as SDA and SCL. The input is provided by a pushbutton connected to PB2 used also to wake up the microcontroller from the deep sleep mode.
Firmware uploading
The full code and firmware can be downloaded from the github page. The code can be built and uploaded using PlatformIO and this guide. Alternatively, you can just download the firmware.hex file and load it into the ATtiny10 using avrdude and USBASP:
./avrdude -e -v -p attiny10 -C ./avrdude.conf -c usbasp -U flash:w:firmware.hex:i -P usb
Use the appropriate path to the avrdude configuration file. Also consider that the USBASP has to have the latest firmware to support the TPI interface. You can refer to this page to update it.
The code
I started writing the game in C but I soon realized I needed full control of the registers and instructions to keep the code small. So the intention was to write the key functions in assembly but I ended up writing the entire game with it.
Given the space constraints, some problems required some out-of-the-box thinking. I share below the details of some key parts of the code with the hope it may inspire you to make something better.
If you don’t know assembly you can learn the basics in a few hours 2 and is something I strongly recommend. It can really boost your understanding of C and the CPU in general. In some cases, I include what the C version of the code would look like to ease the understanding.
The Player
The player is represented by a sprite 8 pixels wide and 11 pixels tall.
![]() - The player sprite. The bitmap height is 16 bits (2 bytes) but only 11 are used -
- The player sprite. The bitmap height is 16 bits (2 bytes) but only 11 are used -
And this is the sprite bitmap:
player_sprite:
.byte 0x00, 0x0e ; Column 1
.byte 0x00, 0x18 ; Column 2
.byte 0x00, 0xfc ; Column 3
.byte 0x00, 0x3f ; Column 4
.byte 0xc0, 0xff ; Column 5
.byte 0xa0, 0x0f ; Column 6
.byte 0xe0, 0x02 ; Column 7
.byte 0xc0, 0x00 ; Column 8
To draw the player one must consider that it only moves up and down. Hence only occupies a portion of the screen that is as wide as the sprite (8 pixels) and extends vertically across the whole screen (32 pixels). The data is sent to the display one column at a time and each column is made by 32 bits. I first load the sprite into the lower half of a 32 bit variable split in 4 registers (8 bits each):
    ldi page1, 0x00
    ldi page2, 0x00
    ld  page3, Z+        ; Upper half of the sprite
    ld  page4, Z+        ; Lower half of the sprite
Then I move the bytes right (because of the display orientation) a number of times same as the player y position
loop_h:
    lsr page4           ; Move one bit right for as many positions as the sprite y position
    ror page3           ; Move right because of the display orientation
    ror page2
    ror page1
dec_h:
    dec _h              ; Loop over the player y position
    brpl loop_h
This is similar as doing var >>= _h in C with var being an uint32_t.
Then I write these bytes to the display RAM and repeat for each one of the 8 columns the sprite is made of.
Jump
![]()
The game only requires one input to make the player jump. The input comes from a push-button connected to PB2 of the ATtiny10.
The button press is recognized by an external interrupt service routine that comes handy also to wake up the device from deep sleep.
Two variables are used to manage the jump: one is the player vertical position and the other defines the movement direction. Let’s call it vertical speed. The speed can be either a positive or negative constant or zero. When the button is pushed the speed is set to +JUMP_SPEED (that is an arbitrary number of pixels).
INT0_vect:
    ldi jump, JUMP_SPEED
    reti
In each frame, the player y position is increased by the vertical speed and the player goes up.
When the maximum height is reached the vertical speed is changed to negative and the player starts going down. When he touches the ground the speed is set to zero.
; Move the player
    add     H, jump     ; Change height by jump direction
    cpi     H, H_MAX    ; Check if H_MAX is reached
    brlo    .+4
    ldi     jump, -JUMP_SPEED     ; Start falling
    rjmp    .+6
    tst     H           ; Check if heigh is 0
    brne    .+2
    ldi     jump, 0x00  ; If ground is reached speed is 0
Update obstacles position
There can be at most three obstacles in the screen. Their positions are stored in three variables in the RAM In each frame, the position of the obstacles is updated decreasing it by a certain number of pixels. If the obstacle #1 is passed, its position will eventually become negative. At that point, the obstacles positions #2 and #3 are moved into #1 and #2. The position #3 is loaded with 0 meaning there are only two obstacles on screen now.
    subi    pos1, STEP         ; Move enemy position by STEP
    brpl    .+6                ; If negative swap position 1 and 2 with 2 and 3
    mov     pos1, pos2
    mov     pos2, pos3
    ldi     pos3, 0x00         ; Load position 3 with 0
If there are less then three enemies on screen a new one needs to be generated. I do this with a sort of Xorshift random number generator. I also xor the current state of the RNG with the player height that can be considered a source of randomness. If the pseudo-random number generated is above a certain threshold a new obstacle is generated at the end of the screen (position 120)
; Xorshift RNG (kind of...)
    lds     tmp1, rand      ; Load previous random number
    mov     pos3, tmp1      ; Copy it in a variable
    lsl     pos3            ; Shift left by 1 position
    eor     tmp1, pos3      ; XOR the two numbers
    eor     tmp1, R16       ; XOR with player height that is quite random
    sts     rand, tmp1      ; Store the new random number
    ldi     pos3, 0x00
    cpi     tmp1, 190       ; If the random number is greater than 190 generate a new one
    brlo    enemy_generated
new_enemy:
    ldi     pos3, 120       ; A new enemy is generated
Print the obstacles
Printing the obstacles is done updating the last page of the display. I loop over the entire screen width from the column 0 and compare the current column with the position of the obstacles.
 - Very dangerous bushes -
If these are equal print the display, otherwise the column is empty.
    ld      x_pos, Y+           ; Load obstacle position
loop_comlumns:
    cp      col_cnt, x_pos      ; Compare enemy position with current column drawn
    brne    blank_col
    ldi     ZL, lo8(sprite_obstacle+0x4000) ; Load sprite position pointer
    ldi     ZH, hi8(sprite_obstacle+0x4000)
    ldi     sprite_w, 5         ; Sprite width -1
print_sprite:
    ld      R24, Z+             ; Load sprite byte
    rcall   Tx                  ; Send sprite byte
    inc     col_cnt             ; Increase column count
    dec     sprite_w            ; Increase sprite byte count
    brpl    print_sprite        ; Check if the entire sprite is printed
    ld      x_pos, Y+           ; Next Obstacle position
blank_col:
    ldi     R24, 0x80           ; Lower bit is set to draw the ground
    rcall   Tx                  ; Send data to display RAM
    inc     col_cnt             ; Increase column count
    cpi     col_cnt, 128        ; Check if the whole display width is printed
    brne    loop_comlumns
In C this code would be something similar to this (not tested):
uint8_t *x_pos = &obstacles;
uint8_t col_cnt = 0;
uint8_t i=0;

do{
    if(col_cnt == *x_pos){
        do{
            Tx(sprite[i++]);
            col_cnt++;
        }while(i<sprite_width);
        i=0;
        x_pos++;
    }
    Tx(0);
    col_cnt++;
}while(col_cnt<128);
Score
To have a score you need to store the number itself and translate it in something that can be printed on screen. At first, my thought was to keep the score in a variable. This poses two issues.
First, to have a score higher than 255 you need to use more than an 8-bit variable. With an 8-bit CPU, this means more instructions and in turn more memory occupied.
Second, how do you get each single digit from a binary number? Let’s imagine you want to get the tens digit. One obvious way is to divide by 10 and then do modulus ten of the result: digit = (score/10)%10. The problem is that this is very demanding for a processor that can’t do divisions.
However, I noted that the score only increases starting from zero. This means that I don’t need to know the number but just sequentially print the digits. To understand better consider that the digit font is stored in an array of 5x10 bytes where 5 is the width of the font in pixels. The I use three variables each storing the position of a digit within the array. Each time the score increases the pointer of the units moves to the next digit position (i.e. from 0 to 5, for a font 5 pixels wide). When it reaches the end of the array, goes back to 0 and the variable of the tens moves by one digit. So the score is actually not stored as a number but just as a reference.
print_score:
    lds     R23, score_digit_1      ; Load units position from memory
    subi    R23, (-W)               ; Increase position by font width
    cpi     R23, (W *10)            ; Check if the end is reached
    brlo    store+2                 ; If not, stor the updated variable
    ldi     R23, 0                  ; If 9 has passed restart from 0
    lds     R24, score_digit_2      ; Load tens position from memory
    subi    R24, (-W)               ; Increase tens by width
    cpi     R24, (W *10)            ; Check if the end is reached
    brlo    store                   ; If not, stor the updated variable
    ldi     R24, 0                  ; If 9 has passed restart from 0
    lds     R25, score_digit_3      ; Increase hundreds by font width
    subi    R25, (-W)               ; Increase hundreds by font width
    sts     score_digit_3, R25      ; Store hundreds position into memory
store:
    sts     score_digit_2, R24      ; Store tens position into memory
    sts     score_digit_1, R23      ; Store units position into memory
This is somewhat similar to the C code:
score_digit_1 += W;
if(score_digit_1 = W*10){
    score_digit_1 = 0;
    score_digit_2 += W;
    if(score_digit_1 = W*10){
        score_digit_2 = 0;
        score_digit_3 += W;
    }
}
Game over, sleep and reset
In each cycle, I check if the first obstacle is behind the player or in front of him. In this case, the player position doesn’t matter. Instead, if the obstacle is in the space occupied by the player width, check the player vertical position. If it’s higher than the obstacle, good! Loop again. Otherwise GAME OVER.
; Check if GAME OVER
    lds     enemy_x, enemy_pos
    cpi     enemy_x, 16     ; Enemy position higher than player position. Don't care player height
    brsh    infinite_loop
    cpi     enemy_x, 10     ; Enemy has passed. Don't care player height
    brlo    infinite_loop
    cpi     H, 8            ; Otherwise check if player is above enemy
    brsh    infinite_loop
At game over I invert the display RAM (all dark pixels are lit and vice versa) a couple of times to indicate the game is finished. After that, I switch off the display and set the microcontroller to sleep.
To wake up the system and start a new game you need to press the button; everything is reset and you can play again.
The frame rate
At the beginning of every loop, the program waits for a few milliseconds to set the frame rate. Let’s call it frame rate as it sounds cool but is essentially a delay between one image and another.
How can we pause the microcontroller for a certain time? We can make it count! Since the clock frequency is 1MHz, one clock cycle will take 1us. Therefore 1,000 clock cycles will take 1ms. If we know how many clock cycles a loop takes, we can calculate the number of iterations required for a certain execution time.
In the following code, the number of iterations is passed through registers R24 and R25. The loop just decrease these registers by one. Each iteration takes 4 cycles therefore 4us. A delay of 1 millisecond will be given by 250 iterations3.
; Delay routine
; Input:    Number of iterations: 16-bit in R24 and R25
;           Each iteration takes 4us (0.004ms)
;           Return takes 4us
_delay:
    subi    R24, 0x01
    sbci    R25, 0x00
    brne    .-6
ret
This was a fun project with no real usefulness but that offered a lot of things to learn. I hope you also got something out of it and in case you have comments or questions leave them below.
Other posts you may be interested in
- ATtiny10 Programming with Platformio and Terminal
- OLED Display driven by ATtiny10
- AVR Optimization #2: Mixing C and and Assembly